I forgot to mention one major minor detail from my parts build. You see, the Raspberry Pi 3 has build in WiFi and Bluetooth. That's good. The bad news is that the whole assembly will be trapped inside the metal chassis of my TV. Not very good for wireless signals. Fortunately, there is an external antenna mod you can do on the Pi, with questionable legal ramifications (since you're messing with an FCC approved device, and thus potentially voiding the Pi's certification). I followed along with the
guide here. I ordered the
antenna parts. I was going to attempt to solder on a U.FL connector to the bottom of the Pi, but when I got the parts in hand I determined that the connector was WAY too small for my shaky hands and giant soldering iron.
 |
| Doesn't look so bad on the guide. |
 |
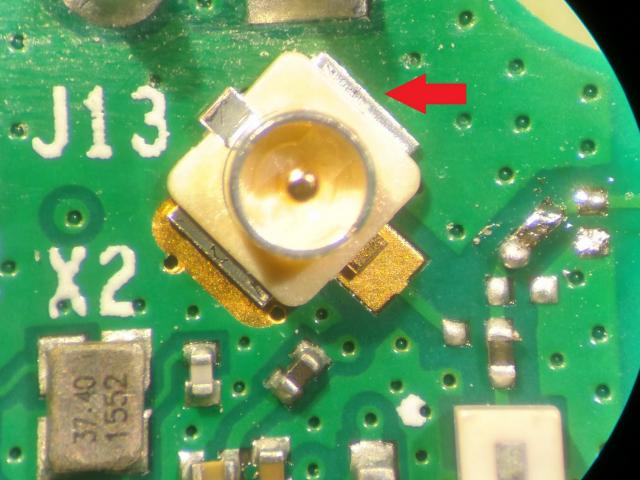
| Oh wait, that spot is smaller than a fingernail. |
 |
| The solder point for U.FL is those two copper pads. You also need to move a Zero Ohm resistor, which is about the width of 5 hairs. How about Nope! |
So I went with plan A on the guide: top mount. I broke off my Pi's ceramic antenna and soldered on the lead for my coaxial antenna. This was a major ordeal, since my solder did not want to stick to either the ground plate, and I had to resolder the thing at least 3 times before a had a solid strong connection.
Ok, now that we have that detail out of the way here are the parts before assembly:
And here's how they're going to look placed in the TV chassis:
 |
| Parts arrangement, so ensure everything would fit. |
 |
| Original (removed) plug on left |
I originally planned to have the SD card ribbon sit just above the USB ports on the Pi. Unfortunately, once the added space of the plastic case was added, there was no room at all for this configuration. I ended up moving it above the Pi (in the direction of the top of the TV). Before I did any cutting, however, I needed to make sure that my 12V to 5V would provide enough consistent power to operate the Pi off of. The 12V connection come on at TV power on. I went ahead and made my power adapter connector, and modified the cable to have the correct sized USB plug on the end.
 |
| Soldered leads together. |
 |
| Wire with electrical tape. |
So, that took care of the business end of the 5V downverter. I enlisted the help of
my lovely wife Nancy to ensure that the Pi would indeed boot when all the parts were connected together.
 |
| Holding the leads to the power supply! |
 |
| You can barely make it out, but the red LED on the pi is lit. Our power supply works! |
 |
| The first cut spot. |
With my power connection verified, I felt now was the time to start cutting. I marked where I thought the SD card ribbon cable would come out with red dry erase marker and got out my dremel. "But Specter," you say, "What about all the metal shavings! Won't they get all over the motherboard and cause all sorts of shorts and damage?!?!" Why yes.
 |
| Dust "Collector" |
But I have this brilliant plan! I'll stick a big rare earth magnet on the other side of the chassis inside a plastic bag, and it will collect all the metal dust for me! What could POSSIBLY go wrong? Did I mention that I was in a strange mood.
Long story short, don't do this. Ever. While I was able to collect a lot of the metal dust the dremel produced, it was impossible to collect ALL of it, and there was a fine coat of dust all over the sensitive electronic components. I got as much up with the magnet as possible, but then I had to get a damp rag out and literally dust every surface I could reach.
 |
| And now.... the first incision. |
I didn't destroy the project with this boneheaded move, luckily. But for every subsequent cut, I took the bracket off the chassis, took it outside, and did my cutting there. And boy am I glad I did. This was 1/16" thick STEEL. It took a relatively long time to do all the cuts, and then buff out the burrs and do fine trim ensuring consistent sizing.
While I had the plate off, I went ahead and drilled a hole for my external antenna, down near the existing coaxial "antenna" spot. Here's how it all looked after all the steel cutting and parts approximately in their final places.
 |
| New Window |
 |
| Components in place |
 |
| JB Welded. And proper plug placements |
You can see in the above picture that the clear plastic case has no venting to speak of over the CPU (which has a heat sink). This will come up in part 3 of this series. Now, the only thing left to do was JB weld it all together. The container claimed that the compound would take 15 minutes to set, and 30 to be at a machinable cure. Perhaps I got a bad mix, but it took at least 30 minutes for it to set for me.
Anyway, I got it to set, and got all my piece parts in place where I wanted them. The power supply cable fit nicely in the crevice between the TV PSU and the TV motherboard. I was able to snake it up and around to the pi plug without it getting in the way of anything. The SD card ribbon wrapped up with a rubber band. The AV cable JUST fit between the SD card port block and the pi itself. But this cable is now permanent. The plastic case is welded to the chassis, as is the SD card port, and there's no room now to remove the plug from the pi. I sure hope that I don't regret going with AV for my video. Time to close it up.
 |
| That dust was from the dremeling before. Yuck. |
The final plan is going to be to wall mount this TV in my kid's playroom in 6 months or so. I'm a little bit concerned that the meat I took out of the side plate might have compromised the strength of the VESA mount plate that attaches to it. Here's hoping it doesn't fall off the mount. I'll let you know if it does. Only thing left is to plug it in, turn it on, and see if it works.
 |
| It Works! Plex image from Part 1 running clearly! |
I wish I could say that this is the end of the tale. That this ended here, with no further problems, and that this mod only took me 2 days to do, instead of 3 weeks. But I can't. There will be a part 3 of this series. Perhaps even a part 4 and 5. But though the struggle was long and epic, the results are awesome.


No comments:
Post a Comment